Showing posts with label Misc.. Show all posts

Friday, July 13, 2012

Choose An Entry Level DSLR


People who own a point and shoot camera eventually want to move to having a DSLR. Other reasons could be you want clearer images, you want more control over your camera or you want to become a professional photographer.
Whatever your reason, you can start with having an entry level DSLR. This is lighter than the real DSLR and is more affordable as well.
So first things first. Consider the brand and you have many to choose from - Canon, Fujifilm, Kodak, Nikon, Pentax, Panasonic, Olympus and Sony. Most share the same features but if you often travel and take photos during special occasions, you need to pick a model that's easy to operate but at the same time one that can ensure image quality.
  • The brand
For those who are serious in getting into photography, the two famous brand names you should consider are Nikon and Canon. Most, if not all, professional photographers use these brands.
  • The sensor
As for the digital camera components, the camera sensor is an important consideration if quality images are your priority. Basically, there are two types of sensors - the CCD and the CMOS. The CMOS is present in the latest cameras today owing to its lower production cost while the older models utilized the CCD which provides better quality photos.
  • The body
Consider as well the camera body. This is essential particularly if you have plans of purchasing high-end accessories in the future and because you will need to get accessories such as the lens that match the body.
Most entry level DSLR cameras today have quality plastic bodies. Weather sealing, however, is what gives the higher type or the professional DSLR the edge. Hopefully, this will be made available for the entry level models in the future.
  • The material
When it comes to material, you have a choice between getting a metal and a plastic body. There's no doubt that the metal body is more durable and allows for better heat conduction notably while shooting videos. Nikon and Canon manufactures both metal and plastic bodied digital cameras.
  • The resolution
Some people often prefer cameras that have bigger megapixels thinking that it will give them better quality images. But this is a misconception.
Do understand that you need a higher megapixel camera only if you would like to print large photos. This is because printing a large size image requires more megapixels to produce clearer and crisper photos. A higher resolution is also ideal if you do extensive post processing of your images such as cropping without affecting the quality.
But if you just want to snap and store photos on your computer and share them online, then a 3.5 to 5 megapixel camera will do.
  • The price
The camera's affordability should be an important consideration. Know that you will not only be spending for the camera body alone but for other necessary accessories as well so make sure that you get only what you can afford. Calculating your expenses will help you choose the right entry DSLR camera that fits your lifestyle.


Share/Save/Bookmark

Wednesday, June 13, 2012

Three Ways to Select Your Image in Photoshop

This tutorial will introduce you to three very different and very simple ways to help select your image. Selection is the basis to running it all in Photoshop.

Method No.1. "Edit in Quick Mask Mode"

1. Open an image in Photoshop.

2. Select brush tool and set its size according to what you select on your image. For example, set the brush size to 8 pixels when you select something really tiny.

3. Foreground color must be black.

4. Before applying the brush to your image for selection, click on Edit in Quick Mask Mode. Now your brush is ready for selection. Notice that the areas you apply your brush to turn pink. If your selection goes out, you can fix it by first setting the foreground to white, and then using your brush tool to ‘erase off’ the unwanted selection. To continue your work, ensure that you reset the foreground color to black. To make it easier on your nerves, you might want to try zooming in and out on your image. It really helps.

5. To zoom in press CTRL +

6. To zoom out press CTRL -

  
7. When you’re satisfied with the selection you’ve made, click on Edit in Quick Mask Mode again.

8. Press CTRL+SHIFT+ I
  
9. Now press CTRL + J. A new layer consisting of only what you’d selected will be created.

That’s method 1.

Method No. 2. "Quick Selection Tool"

1. Open an image in Photoshop.

2. Select Quick Selection Tool.

3. You can change the size of the selection tool according to what you select on your image. Also, you must take note of two more important features. These are the angle and the roundness of the selection tool. You can change these depending on your selection needs.


4. To fix a selection, or to deselect a selection, use the Subtract from selection tool.

5. Press CTRL + J

That’s method 2.

Method No. 3. "Color Range"


1. Open an image in Photoshop.
Now I am going to select all flowers. For this image the best way of selection is Color Range.


2. Go to Select > Color Range.

3.  Pick the Eyedropper tool and click on the red color on your image. To select the different shades of red on your image, make use of the Add to Sample tool.

When you’re done, just click OK.

4. Press CTRL + J.

That’s method 3.
Now, to change the background of your layer with another image, you can simply load a new image and drag and drop it onto the selection layer.


Share/Save/Bookmark

Saturday, December 8, 2007

Photoshop Shortcuts Cheatsheet for CS2

Photoshop Shortcuts Cheatsheet for CS2


Move faster in Photoshop using keyboard shortcuts. Download this handy PDF cheatsheet, print it out and keep it near your computer (you can choose between a Mac or Windows version):

(Right Click Below Link and Save target as)

Photoshop CS2 Keyboard Shortcuts (Windows)

Photoshop CS2 Keyboard Shortcuts (Macintosh)

These PDF's include 4 pages. The first two pages are organized by function in Photoshop, the last two pages have all the shortcuts organized alphabetically by keystroke (an interesting idea).


How To Change Photoshop Keyboard Shortcuts (CS & CS2 Only)

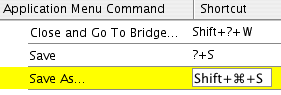
To create your own shortcuts in Photoshop CS or CS2, go to the Edit Menu and select Keyboard Shortcuts. The Keyboard Shortcuts dialog box serves as a shortcut editor, and includes all the commands that support shortcuts.

To modify the keyboard shortcuts you'll have to create a new keyboard shortcut set by clicking on the New Keyboard Set button (the icon to be clicked is immediately to the left of the trash can icon). You'll then be asked to name and save your shortcut set. Now select a heading from the dropdown menu on the left that says Shortcuts For. This allows you to view all of the Photoshop commands in either the Application Menus, the Palette Menus, or the Tools.

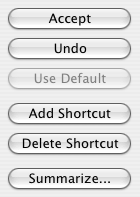
Once you've selected a heading you can search through the contents to locate the command you’d like to change or create a shortcut for. Commands that already have shortcuts will be indicated in the menu. You can change these if you’d prefer by clicking on the shortcut, typing in a new shortcut, and pressing Accept at the top right side of the dialog box.

To make a totally new shortcut, click on the blank space beside the menu command and type in the shortcut you’d like to use. To save it click on the Add Shortcut button.


The hardest part here is finding a key combination that's not already taken. Even the Keyboard Shortcut command has a shortcut (it's Shift-Option-Command-K for Mac and Shift-Alt-Ctrl-K for Win).


Share/Save/Bookmark