The easiest way to avoid underexposed photos is to adjust your aperture settings, your shutter speed and your film speed when shooting. That's sounds pretty easy, right? Forget it. Photoshop was invented for the "I-can't-find-time-to-read-the-manual" photographer. Who cares if it's too dark or too light, we've got Photoshop!
If you don't have CS, then the following trick will help you achieve similar results. I actually find this method produces better results. This trick is work on all photoshop versions.
Here is the original image.

Step 1 — New LayerOpen your photo and make a copy of the Background Layer by choosing Layer> Duplicate Layer, or by dragging it to the New Layer Icon at the bottom of the Layers palette.
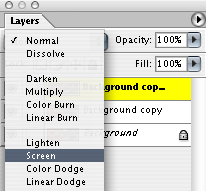
Step 2 — Change The Blend ModeIn the Layers palette change the Blend Mode of the new layer from Normal to Screen. This will lighten the photo uniformly.
Step 3 — RepeatNow repeat the entire procedure again. Create a new layer, change the blend mode to screen, and then take a look at the result. Continue doing this until you go from "oh-my-god it's almost perfect" to "oh-my-god I've ruined it!"
Step 4 — Lower The OpacityNow leave that last layer active even though it's taken you too far and lower the Opacity using the slider at the top right of the layers palette. This lowers the intensity of the effect. When you've found the right amount, you can flatten your image.
Step 5 — Flatten And SaveChoose Layer> Flatten or use the palette’s flyout menu and choose Flatten Image. That's it. Save your file (File> Save) and you're done.

1 comment:
great thanks.
adobe basics
Post a Comment